Download Project Files

Laser Engraved Tiger Tiles

Materials Needed

Machine Used

Titles Engraving  

Fill-Speed

4000mm/min

Line Interval

0.1mm

Power

100%

Pass

1

  • How to Laser Engrave Tiger Tiles with the AlgoLaser Pixi 10W

Laser engraving on tile has become a creative outlet for artists, makers, and home décor enthusiasts alike. Among the many popular themes, tiger designs—fierce, majestic, and full of personality—make a strong visual impact, especially when engraved on glossy white tiles. With the AlgoLaser Pixi 10W laser engraver, achieving professional-quality results is more accessible than ever.

This Guide walks you through 5 essential steps to laser engrave tiger tiles with engraving paper—ideal for both beginners and seasoned crafters. Whether you're creating unique coasters, decorative plaques, or personal gifts, you'll learn how to do it with confidence. We'll also answer 6 frequently asked questions and provide optimal settings to get it right the first time.

Materials and Tools You'll Need

Before we dive into the process, make sure you’ve gathered the following:

·  AlgoLaser Pixi 10W laser engraver

·  White ceramic tiles

·  Special engraving paper (heat-sensitive transfer film or laser marking sheet)

·  Water and clean cloth

·  Computer with image editing software (optional)

·  USB or SD Card to transfer design

·  Focusing column included with your laser engraver

Step 1: Prepare Your Tile and Design

The quality of your engraving starts with your setup and preparation. In this case, your tile should be clean, dry, and prepped with engraving paper.

Place the Tile in the Engraving Area

Attach the laser-compatible engraving paper to the front of the white tile. Ensure the paper is flat, without air bubbles or wrinkles. Then, place the tile—paper side up—within the engraving zone of the AlgoLaser Pixi. Keep it centered for optimal framing.

Use the Focusing Column

Next, place the focusing column (or gauge block) between the laser module and the tile. Adjust the Z-axis screw (or knob) until the laser head just touches the column. Once set, remove the column. This ensures you're operating at the correct laser focal length for precise engraving.

Step 2: Load and Adjust Your Tiger Design

Let’s move to the software interface. On your Pixi touch screen or connected software (like LightBurn or AlgoOS), follow these steps to load your design.

Click “Projects” > “SD Card”

Navigate to the “Projects” section on the screen, then tap “SD Card” to access saved image files. Select your pre-uploaded tiger image (typically a black-and-white PNG or SVG for best results).

Click on “Invert Color”

This is an important step: invert the image so that the tiger design appears white on a black background. Since the engraving burns only the dark areas, inverting the image ensures the design will appear correctly on the tile.

Set Engraving Parameters

Using the AlgoLaser Pixi 10W, here are your recommended parameters:

·  Speed: 4000 mm/min

·  Power: 100%

·  Line Interval: 0.1 mm

·  Pass: 1

·  Material: White ceramic tile with engraving paper

These settings ensure enough heat to activate the engraving paper and mark the tile’s surface without cracking or overburning.

Step 3: Position and Frame the Image

Positioning is key to ensuring your tiger design is centered and fits your tile perfectly.

Click on “Motion”

Tap the “Motion” button to let the laser module home—this returns it to the zero point. Starting from home ensures your image placement begins from a predictable reference corner.

Adjust Image Size

Resize the image to fit your tile. For standard 100mm x 100mm tiles, set your tiger graphic to slightly smaller dimensions (e.g., 90mm x 90mm) to avoid engraving too close to the tile’s edge.

Drag to Position

Click and drag the image within the engraving interface until it aligns perfectly with the center of the tile in the preview.

Use the Frame Button

Tap the “Frame” button to have the laser trace the perimeter of your design without engraving. This helps you visually confirm the image is aligned with the tile.

Step 4: Begin Engraving

Once everything looks good, it’s time to let the Pixi do its magic.

Click “Start Engraving”

With all parameters set and the design framed correctly, click the Start button. The laser will now begin engraving your inverted tiger design onto the engraving paper.

Keep an eye on the process, especially for the first few passes, to make sure the laser is engraving cleanly and isn’t burning the tile itself. With the Pixi’s fine 0.1mm line spacing, your results should be sharp and detailed.

Step 5: Clean and Reveal the Design

After the engraving is finished, you’re only a couple of steps away from seeing your final masterpiece.

Soak in Water (3-5 Minutes)

Take the tile and soak it in water for 3 to 5 minutes. This softens the engraving paper and loosens the adhesive, making it easier to peel off without damaging your design.

Wipe Clean

Carefully peel off the softened engraving paper. Then, use a soft cloth or paper towel to gently wipe the tile clean. Your engraved tiger design should now be visible in crisp contrast on the white tile surface.

6 Common FAQs About Laser Engraving Tiles

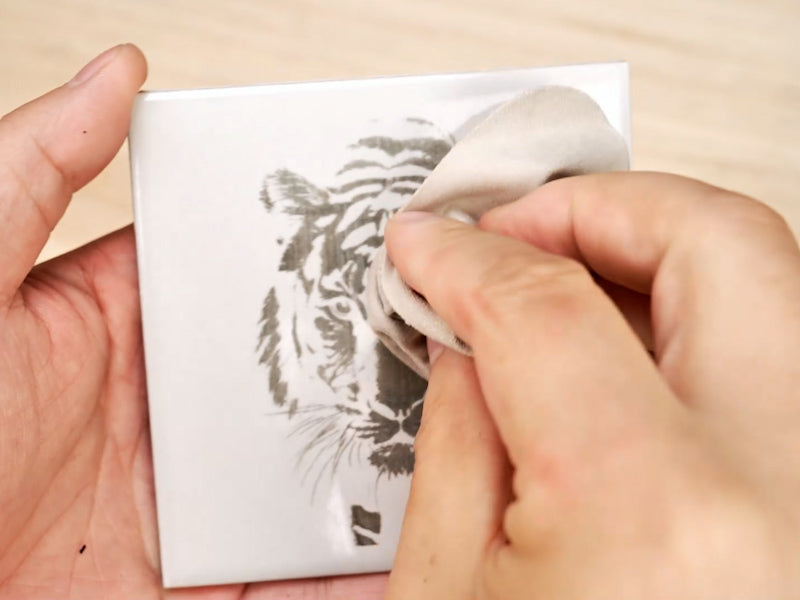
Q1: Can I engrave directly on tiles without engraving paper?

You can, but it often results in less contrast. Engraving paper enhances detail and contrast while reducing the risk of tile chipping.

Q2: What kind of tiles work best?

Glossy white ceramic tiles provide the best visual contrast when engraving with a diode laser. Matte or colored tiles may require different settings.

Q3: Do I need to seal the tile after engraving?

It depends on use. For coasters or outdoor decor, consider sealing with clear acrylic spray for durability.

Q4: Can I reuse the engraving paper?

No. Engraving paper is single-use only. Once it's burned through by the laser, it won’t provide accurate results again.

Q5: What file format works best?

High-contrast black-and-white PNGs or SVGs are ideal. Avoid grayscale for tile engraving with a diode laser.

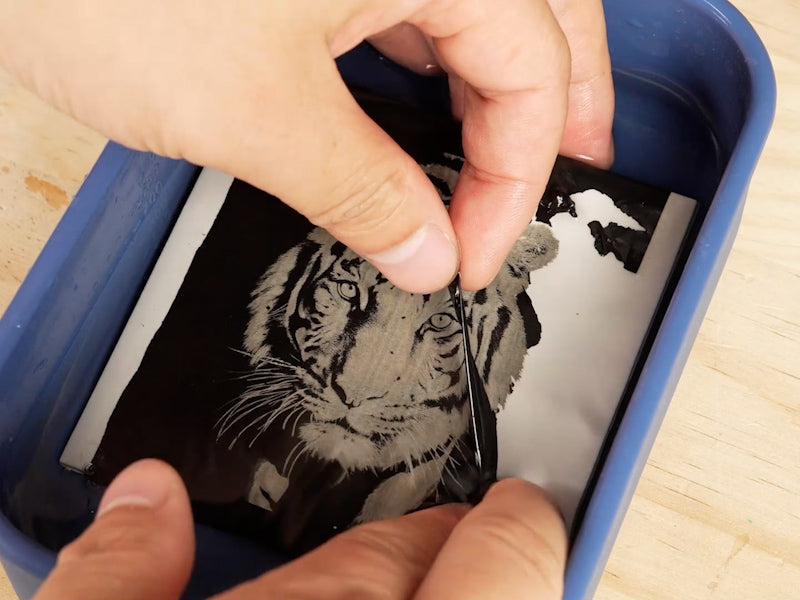
Q6: What if the image doesn’t stick or is blurry?

Check your focus, speed, and power settings. Make sure your engraving paper is pressed flat without air pockets. Also ensure you’re using “Invert Color” before engraving.

Bonus Tips from the Laser Engraving Community

Drawing inspiration from Reddit’s r/Laserengraving and maker forums, here are a few expert tips:

·  Use painter’s tape to mask surrounding areas on the tile for clean borders.

·  Preheat the tile slightly with a heat gun before engraving to reduce stress cracking (optional).

·  Keep a spray bottle of water nearby during engraving in case you smell excessive burning—though ·  rare with engraving paper, it’s better to be cautious.

·  Test on a scrap tile first. Settings can vary slightly depending on tile glaze or engraving paper brand.

Final Thoughts

With the AlgoLaser Pixi 10W laser engraver and some simple preparation, laser engraving tiger tiles is not only doable—it’s downright fun. From prepping the tile to peeling back the paper, every step gives you a sense of progress and creativity. The results? Eye-catching designs that command attention and add a handcrafted touch to your space.

Whether you’re selling them on Etsy, gifting them to friends, or decorating your own home, laser-engraved tiles are the kind of project that never gets old—especially when they showcase something as iconic as a tiger.

So go ahead—grab that engraving paper, fire up your Pixi, and show off your wild side.

You May Also Like