


Home / How - To

Laser Engraving and Cutting Wooden Halloween Crafts: A Beginner's Guide
Halloween is the perfect time to bring creativity to life with spooky decorations and unique crafts. Using a laser engraver, you can create intricate and personalized wooden items that add a special touch to the holiday. This guide will walk you through various Halloween-themed wooden projects, including design tips, laser settings, and finishing touches, making it easy for beginners to get started.

1. Introduction to Laser Engraving and Cutting Wooden Crafts
2. Wooden Stamp: Deeply Engraved Halloween Design
Creating custom wooden stamps with Halloween themes can be a fun way to decorate invitations or gift bags.
- Designing the Stamp: Choose Halloween motifs like pumpkins, bats, or witches. Use design software like LightBurn to prepare the engraving pattern.
- Wood Selection: Opt for dense hardwoods like maple or beech for detailed engraving.
- Laser Settings: Use a slower speed and higher power for deep engraving. Perform multiple passes for depth.
- Post-Processing: Clean the engraved surface with a brush, then attach the stamp to a handle using wood glue.


3. Full Set Picture Wooden Dice: Warlock Style
Create a full set of Halloween-themed wooden dice engraved with mystical symbols.
- Design the Dice Layout: Use LightBurn or similar software to create dice faces with warlock-themed symbols, such as runes or magical creatures.
- Choosing the Right Wood: Light-colored woods like birch or poplar work well for engraving.
- Engraving Technique: Set a lower power and higher speed to avoid burning the wood while still achieving detailed engravings.
- Finishing the Dice: Sand the edges, stain the wood for a darker finish, and seal with a wood-safe lacquer.


4. Wood Playing Card Holder: Wolf in Full Moon Engraved Wood Card Deck Box
An engraved wooden card box can be an eye-catching accessory for Halloween game nights.
- Design Considerations: Engrave a wolf howling at the full moon. Position the engraving to fit the front surface of the box for maximum visibility.
- Laser Settings: Use medium speed and power settings to achieve a deep, visible engraving.
- Finishing Techniques: Sand the box and apply a wood finish to protect it. Consider using a darker stain to make the engraved image stand out.
- Customizing the Interior: Add compartments or padding to hold playing cards securely.


5. Halloween Party Decor and Fun Family Game Board
Engrave and cut a custom game board for Halloween-themed fun.
- Design a Themed Game Board: Create a game board with haunted house imagery, ghostly figures, or witches' brooms.
- Laser Cutting and Engraving Settings: For cutting the board shape, use higher power. For engraving details, use lower power.
- Adding Game Pieces: Laser cut small wooden tokens shaped like pumpkins, bats, or skeletons.
- Painting and Staining: Use acrylic paints to add color to the engraved areas and seal with a clear finish.


6. Wooden Viking Sword With Norse Motif
Craft a wooden Viking sword with laser-engraved Norse symbols, perfect for Halloween costumes.
- Design the Sword: Engrave Celtic knots or runic patterns on the blade. Use design software to ensure symmetry.
- Choosing a Durable Wood: Hardwood like oak or walnut is ideal for this project.
- Laser Cutting and Engraving: Use high power for cutting the sword shape and medium power for engraving details.
- Finishing Touches: Sand the edges smooth and stain the wood to give it a weathered look. Wrap the handle with leather for a more authentic appearance.


7. Occult Game Board: Creating a Wooden Ouija or Mystical Board
Engrave an occult-themed game board, like a Ouija board, complete with symbols and mystical designs.
- Designing the Layout: Include letters, numbers, and symbols associated with the occult.
- Laser Settings for Detailed Engraving: Use lower speed and higher power for fine lines and intricate patterns.
- Finishing Techniques: Apply a dark stain to the board to give it an aged look, then seal with a matte finish.
- Matching Wooden Planchette: Laser cut a small wooden planchette and engrave matching symbols. Use felt pads on the bottom to allow smooth movement across the board.


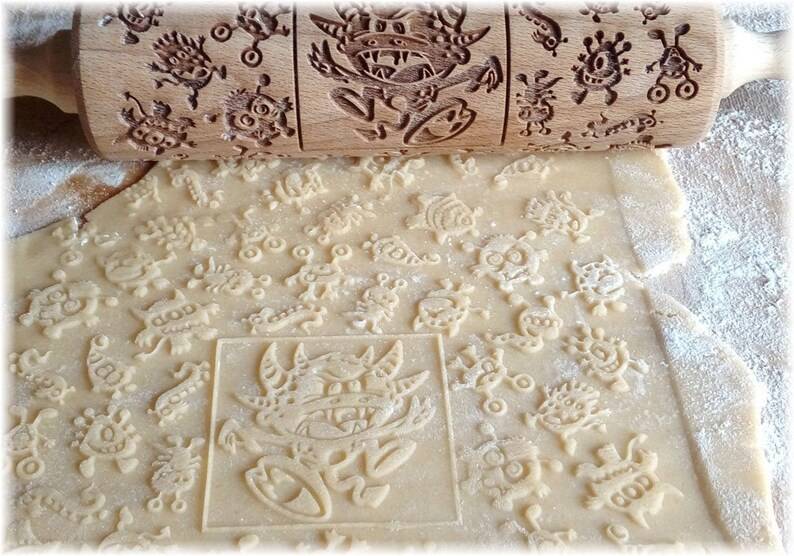
8. Halloween Embossing Rolling Pin
Create a wooden rolling pin with Halloween-themed embossed patterns for baking.
- Engraving on a Cylindrical Surface: Use a rotary attachment for your laser engraver to achieve uniform engraving around the rolling pin.
- Pattern Ideas: Engrave spider webs, skulls, or witches' hats. The depth of the engraving should be sufficient for embossing dough.
- Post-Processing Steps: Sand the rolling pin and finish with a food-safe sealant.


9. Additional Wooden Halloween Craft Ideas

10. General Tips for Laser Engraving and Cutting Wood
11. Conclusion
Laser engraving and cutting offer endless possibilities for creating unique and personalized wooden Halloween crafts. By following this guide, beginners can master basic techniques and gain the confidence to experiment with more complex projects. Whether making decorations for a haunted house, gifts, or costume accessories, using a laser engraver can bring creative ideas to life in impressive detail.
With these projects and tips, you're ready to start crafting your wooden Halloween masterpieces, making the holiday even more memorable!


