


How to Use a Laser Engraver as a Beginner
Laser engraving is a captivating and innovative technology that has witnessed a surge in popularity. As a beginner, learning how to use a laser engraver can be an exciting journey into the world of creative design and personalization. This comprehensive guide will provide you with the knowledge and confidence to embark on your laser engraving adventure.
Laser Engraving - A brief definition, its demand, and appeal for beginners
Laser engraving is the process of using a high-powered laser to etch or engrave intricate designs and patterns onto a variety of materials, ranging from wood and acrylic to glass and metal. Its applications are vast and continue to expand, making it a sought-after technology.
The demand for laser engraving has soared in recent years due to the growing interest in personalized and custom-made products. From personalized gifts and jewelry to industrial applications like marking and branding, laser engraving offers a unique and precise method of creating one-of-a-kind items.
For beginners, the appeal of laser engraving lies in its versatility and potential for creativity. This technology allows you to turn your ideas into tangible products, giving you the power to create unique, personalized items. Whether you're an artist looking to add intricate details to your creations or an entrepreneur seeking to offer custom engraving services, learning how to use a laser engraver can be a fulfilling and rewarding experience.
Importance of learning and understanding the process up front
Before delving into the world of laser engraving, it's essential to gain a fundamental understanding of the technology and its processes. Laser engravers are precision machines, and understanding how they work is crucial for achieving accurate and high-quality results. Additionally, grasping the safety protocols is vital to ensure a safe and productive engraving experience.
This blog is your comprehensive guide to using a laser engraver as a beginner. We will walk you through every step of the process, from understanding the basics to mastering the art of laser engraving. By the end of this guide, you will be well-prepared to create your laser-engraved projects with confidence and creativity.

Discuss the basic structure of a laser engraving machine
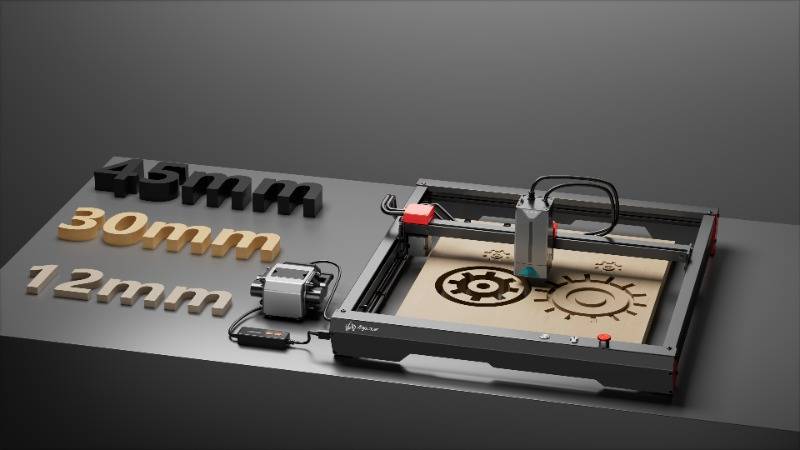
A laser engraving machine is a precision tool consisting of several crucial components that work in harmony to produce detailed and precise engravings. Understanding the basic structure of these machines is fundamental to using them effectively. Let's explore each key component:
1. Control Panel
The control panel is the brain of the laser engraving machine. It houses the interface through which you set and adjust various parameters for your engraving. These parameters include power, speed, resolution, and any other settings relevant to your specific project. A user-friendly control panel is essential for both beginners and experienced users, as it enables you to customize your engraving precisely.
2. Laser Source
The laser source is the heart of the machine. It produces a high-intensity laser beam that is directed onto the material's surface for engraving. There are different types of laser sources used in engraving machines:
CO2 Lasers: These lasers are versatile and can engrave a wide range of materials, making them suitable for applications in both hobbyist and industrial settings.
Fiber Lasers: Fiber lasers excel at marking and engraving metals, such as stainless steel and aluminum, with precision. They are commonly used in industries requiring high-contrast marks on metal surfaces.
Diode Lasers: Diode lasers are compact and portable, making them great for small-scale projects and those on the go. They are often used in the engraving of smaller items and for mobile engraving services.
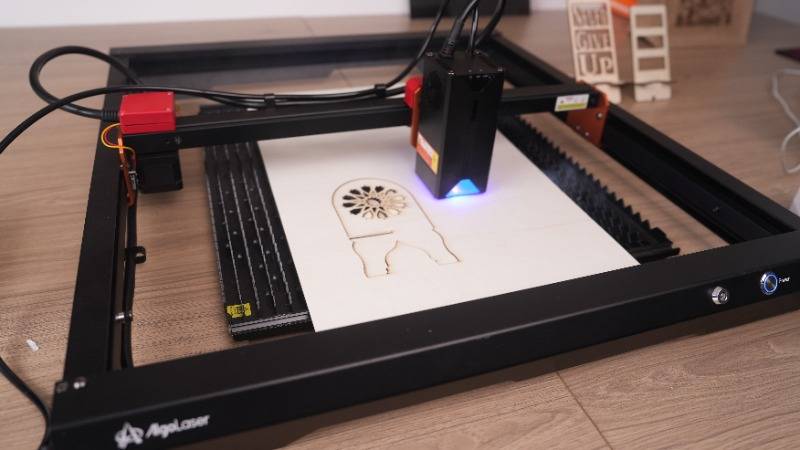
3. Working Bed
The working bed is the surface on which you place the material to be engraved. It must be level and stable to ensure that the laser's path remains consistent throughout the engraving process. Different laser engraving machines may have varying bed sizes and types, which can influence the maximum material dimensions and the range of projects you can undertake.
Significance of understanding the mechanism of every part and their synchronization
Understanding the mechanism and function of each part of a laser engraving machine is critical for several reasons:
Quality Control: When you comprehend how each component operates, you can better control the engraving process. Adjusting settings on the control panel, such as laser power and speed, will lead to crisper, more accurate engravings.
Material Compatibility: Knowledge of the laser source type and its compatibility with different materials is vital. It enables you to select the right machine for your specific applications. For example, CO2 lasers are versatile, while fiber lasers are best for metal engraving.
Safety: Understanding the synchronization of machine components also plays a significant role in safety. It helps you ensure that the laser is properly contained and that there is minimal risk of accidents. Safety measures are crucial in laser engraving, including the proper use of laser safety glasses.
Maintenance: Knowing how each part functions is valuable for machine maintenance and troubleshooting. It allows you to identify issues and perform basic maintenance tasks, which can extend the life of your laser engraving machine.
In essence, understanding the mechanics of a laser engraving machine empowers you to operate the equipment safely, create high-quality engravings, and make informed decisions when selecting the right machine for your projects. Additionally, it's essential for troubleshooting and maintaining the machine, ultimately ensuring your continued success as a laser engraving beginner. With this foundational knowledge, you're ready to move on to the next steps of the laser engraving process, including safety measures, material selection, and design creation.
Safety Measures to Follow
Safety should be the top priority when using a laser engraving machine. Lasers, especially high-powered ones, can pose risks if not used correctly. As a beginner, it's crucial to understand and follow essential safety measures to protect yourself, others, and the equipment.
Discuss safety wears, like shades, gloves, etc.
Laser Safety Glasses: Laser safety glasses are a non-negotiable safety accessory when working with laser engravers. These glasses are specially designed to block or attenuate the laser's specific wavelength, ensuring that your eyes are protected from potentially harmful laser radiation. The glasses should match the laser's wavelength and have a sufficient Optical Density (OD) rating to provide adequate protection.
Protective Clothing: While laser engraving doesn't generally produce flying debris, it's a good practice to wear long sleeves and pants to protect your skin. Loose clothing, jewelry, and accessories should be avoided, as they can potentially get caught in moving parts.
Gloves: Wear gloves when handling materials, especially if you're working with sharp or potentially hot objects. While gloves can protect your hands from cuts and burns, ensure they are not made of materials that can catch fire under the laser beam.
Respirator: In cases where materials being engraved may emit fumes or odors, it's advisable to wear a respirator to protect your respiratory system. This is particularly relevant when working with certain plastics, metals, or other materials that can produce harmful byproducts when engraved.
Address how to maintain an appropriate working environment
Ventilation: Ensure proper ventilation in your workspace. Laser engraving can produce fumes and particulates, depending on the material you're working with. A well-ventilated area helps disperse any fumes, reducing the risk of inhaling potentially harmful substances. If your workspace lacks natural ventilation, consider using an exhaust system, like a fume extractor or an air filtration unit.
Fire Safety: Be prepared for the possibility of small fires. Some materials, particularly plastics, can ignite when subjected to the laser beam's intense heat. Have a fire extinguisher within reach and know how to use it. Keep a close eye on the machine while it's running, especially during the early stages of operation when you're still learning the ropes.
Eye Protection: In addition to wearing laser safety glasses, it's essential to prevent bystanders or other individuals in your workspace from being exposed to the laser beam. Using safety screens or curtains can help contain the laser beam and protect others in the vicinity.
Cover the major risks and prevention
Eye Injury: The primary risk associated with laser engraving is eye injury. The laser's focused beam can cause damage to the retina if viewed directly. The best prevention is the use of appropriate laser safety glasses and ensuring that no one looks directly into the laser beam.
Fire Hazard: Laser engraving can pose a fire hazard, particularly when engraving materials like plastics, can ignite. Prevention involves choosing materials that are less likely to catch fire, closely monitoring the machine while it's running, and having a fire extinguisher on hand.
Fume Inhalation: Some materials can produce harmful fumes when laser-engraved. To prevent this, work in a well-ventilated area and, if necessary, use a fume extraction system or wear a respirator.
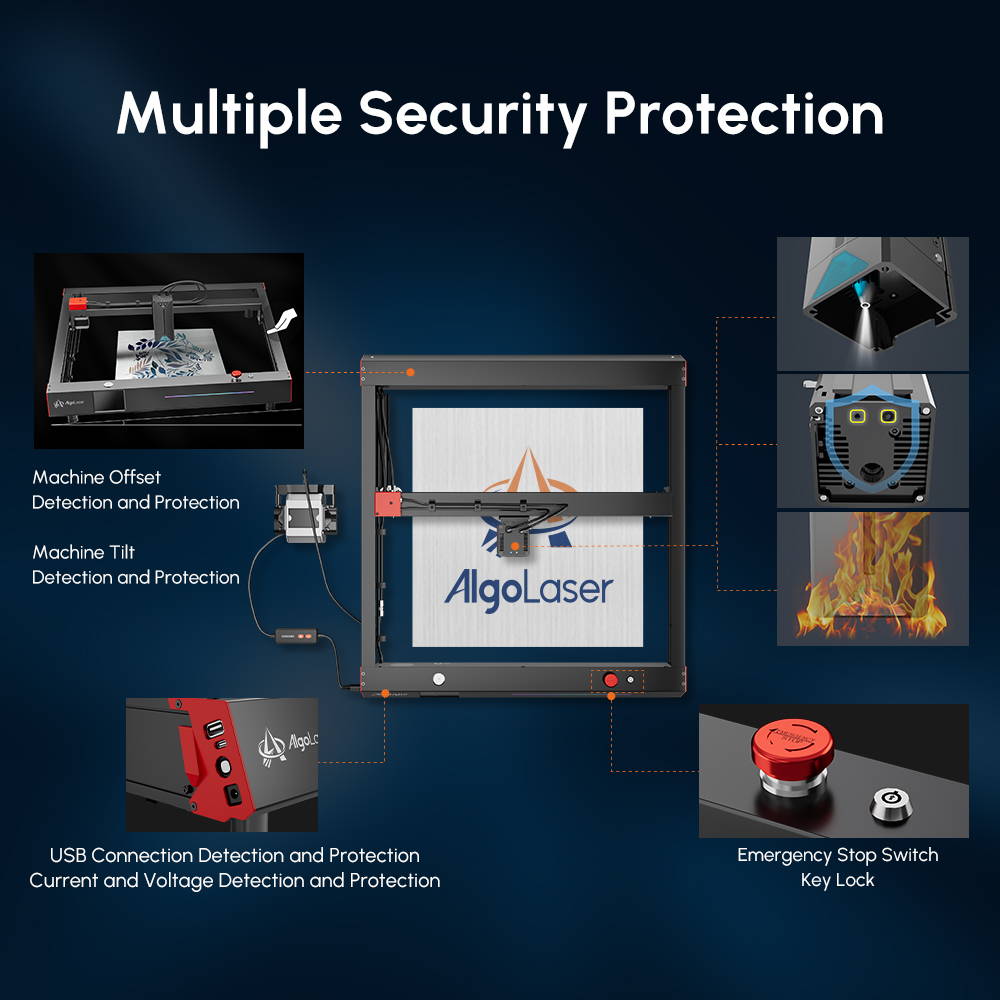
Machine Safety: Always follow the manufacturer's instructions for machine operation and safety.
Understand the emergency stop procedures and ensure that the machine is properly maintained to prevent accidents due to equipment malfunction.
In conclusion, safety is paramount when using a laser engraving machine as a beginner. By wearing the appropriate safety gear, maintaining a safe working environment, and understanding the major risks associated with laser engraving, you can enjoy the creative and entrepreneurial aspects of this technology while safeguarding your well-being. In the next sections of this guide, we'll explore material selection and preparation, design creation, machine setup and calibration, the engraving process, and post-engraving cleanup, providing you with a comprehensive understanding of how to use a laser engraver effectively and safely.
Material Selection and Preparation
One of the fascinating aspects of laser engraving is its versatility in working with a variety of materials. The suitability of a material for laser engraving depends on its composition and how it interacts with the laser beam. Here are some common materials and a brief explanation of their engraving characteristics:
1. Wood
Wood is an excellent material for laser engraving due to its natural and rustic appeal. Whether it's hardwood, softwood, or plywood, wood engraves beautifully. The laser beam can create intricate and detailed designs on wood surfaces. Popular applications include custom signage, personalized wooden gifts, and intricate artwork.
2. Glass
Glass engraving with a laser creates a stunning frosted or etched effect. It's perfect for personalizing glassware, such as wine glasses, mirrors, or awards. The laser beam can produce fine details on glass surfaces, making it a popular choice for gifts and decorative items.
3. Plastic
Plastics are a versatile material for laser engraving, with different types of plastics offering various results. For instance, acrylic, often referred to as Plexiglas, engraves beautifully and creates a glossy or frosted finish, depending on the settings. PVC and other plastics are also suitable for laser engraving, offering precise and permanent markings.
4. Metal
Engraving metal with a laser is ideal for creating permanent and high-contrast markings. Metals like stainless steel, aluminum, and brass are commonly engraved using fiber lasers. This is particularly valuable for industrial applications, including serial numbers, barcodes, and branding.
While these materials are suitable for laser engraving, it's essential to consider their composition and characteristics. Some materials, like treated or coated metals, may not respond well to laser engraving, and certain plastics can release harmful fumes when engraved. Always check the manufacturer's recommendations for the specific material you intend to engrave.
Discuss the preparation of the material - Clean, smooth, and correct size
Proper preparation of the material is a crucial step in achieving the best laser engraving results. Here are some key factors to consider:
1. Cleanliness
Before engraving, ensure that the material is clean and free from dust, debris, and any contaminants. Even small particles can interfere with the laser beam's accuracy and produce undesirable results. Wipe the material's surface with a soft, lint-free cloth and, if necessary, use a mild cleaning solution that won't leave residue.
2. Smoothness
For optimal results, the material's surface should be as smooth as possible. Rough or uneven surfaces can affect the quality of the engraving. Sanding or preparing the material's surface to a consistent smoothness may be necessary, especially for materials like wood.
3. Correct Size
The material you plan to engrave should fit comfortably within the laser engraving machine's working bed. Ensure that the material's dimensions are within the machine's specified limits. If the material is too large or too small, it can lead to incomplete or misaligned engravings.
It's also crucial to secure the material in place to prevent any movement during the engraving process. Most laser engraving machines come with clamps or securing mechanisms to hold the material firmly in position. Check the manufacturer's guidelines for securing the specific material you are working with.
In conclusion, the selection and preparation of materials are key factors in laser engraving success. Understanding which materials are suitable for engraving and how to prepare them properly sets the stage for high-quality and precise engravings. As a beginner, experimenting with different materials and their settings will help you uncover the full potential of laser engraving. In the upcoming sections of this guide, we will explore the creation and preparation of designs, the setup and calibration of your laser engraving machine, the engraving process itself, and post-engraving cleanup, providing you with a comprehensive understanding of how to use a laser engraver effectively and creatively.
Design Creation & Preparation
Design creation is a crucial aspect of laser engraving. It allows you to bring your creative ideas to life and personalize various items with intricate details. There are several software tools available, and your choice depends on your specific needs and preferences. Let's explore some popular options:
LightBurn
LightBurn is a specialized software designed for laser engraving and cutting. It has gained popularity for its user-friendly interface and comprehensive features tailored to laser enthusiasts and professionals.
Vector and Raster Support: LightBurn allows you to work with both vector and raster graphics. Vector graphics are used for precise and scalable designs, while raster graphics are suitable for creating detailed images.
Import Compatibility: LightBurn supports various file formats, including SVG, DXF, AI, BMP, and more, making it versatile when it comes to importing designs from other software.
Intuitive User Interface: The software offers an intuitive and easy-to-navigate user interface. It's particularly well-suited for beginners who are new to laser engraving software.
Real-Time Preview: LightBurn provides a real-time preview of your design, enabling you to see how it will appear on the material before engraving. This feature is valuable for ensuring your design is properly placed and adjusted.
Adobe Illustrator
Adobe Illustrator is a vector graphics software widely used in the design and engraving industries. While it's not laser-specific like LightBurn, it provides powerful design capabilities for engraving projects.
Vector Graphics: Illustrator is primarily a vector-based software, which is ideal for creating designs that can be scaled without losing quality. This is essential for laser engraving, as it allows you to maintain precision regardless of the material's size.
Versatile Toolset: Illustrator offers a wide range of tools for creating intricate designs. You can draw shapes, lines, and text, apply various effects, and manage layers for organized designs.
Export Compatibility: The software supports common file formats used in laser engraving, such as SVG and DXF, making it easy to import your designs into the laser engraving machine.
Resources and Community: Adobe Illustrator has a vast user community, which means you'll find plenty of tutorials and resources to help you master the software for laser engraving.
CorelDraw
CorelDraw is another popular vector graphics software that's frequently used in the laser engraving industry. It offers a range of design features and tools tailored to vector-based projects.
Vector Editing: CorelDraw excels in vector design. It allows you to create intricate and precise designs, making it a valuable choice for laser engraving.
Photo Editing: CorelDraw includes photo editing capabilities, which can be beneficial if you want to incorporate images or photos into your designs.
Font Management: The software offers a diverse selection of fonts, and its font management system allows for convenient font organization and installation.
Export Options: CorelDraw supports common laser engraving file formats, ensuring compatibility with most laser engraving machines.
When selecting design software, consider factors such as your level of experience, the types of designs you intend to create, and your preferred workflow. Most of these software options offer trial versions or free trials, so you can explore their features before making a decision.
Discuss how to import/export design to/from the machine
Once you've created your design, the next step is to import it into your laser engraving machine and prepare it for engraving. Here's a guide on how to import and export designs:
1. Importing the Design
Save Your Design: Ensure your design is saved in a compatible file format, such as SVG, DXF, AI, BMP, or the format supported by your laser engraving machine. Refer to your machine's user manual for specific compatibility information.
Transfer the Design: Depending on your laser engraving machine, you can transfer the design to the machine using various methods.
These can include:
USB Drive: Save your design file to a USB drive and insert it into the machine's USB port.
Direct Connection: Some machines allow you to connect your computer directly to the machine via USB or network connection.
Wireless Transfer: In some cases, you can send the design to the machine wirelessly using a network connection like Wi-Fi or Ethernet.
Select the Design: Use the control panel or the machine's software interface to locate and select the design file you want to engrave.
2. Preparing for Engraving
Material Placement: Before engraving, ensure the material is securely placed on the machine's working bed and aligned correctly with the laser's focal point. Proper material placement is crucial for precise engraving.
Set Engraving Parameters: Adjust the engraving settings on the machine or its software interface. This includes specifying the laser power, speed, resolution, and other settings depending on the material and design.
Design Preview: Some machines offer a design preview feature, allowing you to see how the design will appear on the material before starting the engraving process. Utilize this function to make any necessary adjustments.
Commence Engraving: Once you are satisfied with the settings and design placement, start the engraving process. Be prepared to monitor the machine during operation to ensure everything is proceeding as expected.
Material Removal: After the engraving is complete, carefully remove the engraved material from the working bed, adhering to safety guidelines. Ensure that the material is free of any debris or residue.
In conclusion, design creation and preparation are fundamental steps in laser engraving. The software you choose should match your needs and preferences, whether you opt for specialized software like LightBurn or widely used vector graphics programs like Adobe Illustrator and CorelDraw. Importing and exporting designs to and from the laser engraving machine is a crucial process, and understanding it will empower you to personalize items and create intricate details with your laser engraver. In the upcoming sections of this guide, we will explore machine setup and calibration, the engraving process, and post-engraving cleanup, as well as offer valuable tips, tricks, and troubleshooting advice to further enhance your laser engraving skills as a beginner.
Machine Setup and Calibration
A crucial part of mastering laser engraving as a beginner is setting up and calibrating your machine correctly. Proper machine setup ensures that your engravings are precise, well-focused, and meet your desired quality standards.
Guide on Placing the Material Correctly on the Machine's Bed
Material Compatibility: Begin by choosing the appropriate material for your project. Ensure it is compatible with the laser engraving machine. Common materials include wood, glass, plastic, and metal. The material should also fit within the machine's working area.
Material Securement: Place the selected material on the machine's bed. Make sure it's flat, secure, and correctly aligned. Many machines have alignment guides or rulers to assist in proper positioning.
Safety Considerations: Be mindful of safety when placing the material. Avoid covering ventilation or exhaust ports that help remove fumes and smoke produced during engraving. Also, ensure there are no loose or flammable materials nearby that might accidentally come into contact with the laser beam.
Masking or Taping: Depending on your material, you may choose to use masking tape or painter's tape to protect the surface from smoke or residue. This can help prevent surface damage or reduce the need for post-engraving cleaning.
Steps to Adjust the Lens to Get the Correct Focus
Lens Inspection: Start by checking the condition of the lens. Ensure it's clean and free from any dust or residue, as these can affect the engraving quality. If needed, clean the lens according to the manufacturer's instructions.
Focusing Tool: Most laser engraving machines come with a focusing tool or gauge. This tool helps you find the correct distance between the lens and the material's surface for optimal focus. Follow the machine's instructions on how to use this tool properly.
Z-Axis Adjustment: Some machines feature a Z-axis control that allows you to raise or lower the bed to achieve the desired focal length. Adjust the Z-axis until the lens is at the right distance from the material. This distance is typically specified in your machine's user manual and varies depending on the lens and material.
Test Engraving: Before engraving your main design, perform a test engraving on a scrap piece of the same material. This test helps you confirm that the focus is correct, and that the engraving quality meets your expectations. Make any necessary adjustments before moving on to your actual project.
Fine-tuning the Power and Speed Settings
Understanding Power and Speed: Laser engraving machines offer settings for power and speed. Power controls the intensity of the laser beam, while speed dictates how quickly the laser head moves across the material. Finding the right balance between power and speed is essential for achieving the desired engraving results.
Material Considerations: The optimal power and speed settings can vary depending on the material you're engraving. Start with the manufacturer's recommended settings for the material, but be prepared to make adjustments based on your test engraving results.
Test Engravings: Perform multiple test engravings on scrap material, varying the power and speed settings to find the sweet spot for your project. Pay attention to factors like the depth of engraving, clarity, and any unwanted effects like burning or charring.
Documentation: Keep detailed notes of the power and speed settings that produce the best results for each material. This will serve as a valuable reference for future projects.
Proper machine setup and calibration are essential for achieving high-quality and consistent laser engravings. Taking the time to correctly position the material, focus the lens, and fine-tune power and speed settings will significantly impact the outcome of your projects. As a beginner, don't hesitate to experiment and make adjustments as needed to achieve the results you desire. In the following sections of this guide, we will explore the engraving process, and post-engraving cleanup, and share valuable tips, tricks, and troubleshooting advice to further enhance your laser engraving skills.
The Engraving Process
Understanding the engraving process is a crucial step in your journey to mastering laser engraving. This process involves several key stages, each contributing to the final result.
Outline of the Process - Preview, Pilot Run, Actual Engraving
1. Design Preview
Before beginning the actual engraving, it's advisable to preview your design. Most laser engraving software, like LightBurn or Adobe Illustrator, allows you to visualize how the design will appear on the material. This preview helps ensure the design is correctly placed and aligned with your material.
2. Pilot Run
A pilot run, also known as a test engraving, is a preliminary step to verify that everything is set up correctly. It involves running a smaller-scale version of your design on a scrap piece of the same material you plan to engrave. The pilot run serves several purposes:
Focus Verification: Check if the laser's focus is correct. If the engraving appears blurry or unfocused, you may need to readjust the lens or material height.
Settings Validation: Confirm that the power and speed settings are appropriate. Pay attention to the depth and clarity of the engraving, making any necessary adjustments.
Material Compatibility: Ensure the material responds as expected to the laser. For example, certain materials may discolor or emit harmful fumes when engraved.
Design Placement: Verify that the design is accurately positioned on the material and that it doesn't extend beyond the material's boundaries.
3. Actual Engraving
Once the pilot run is successful, you can proceed to the actual engraving. This entails running your design on the target material, which can be wood, glass, plastic, metal, or any other material compatible with your laser engraving machine.
Watching the Process and a Note on What to Look Out For
As the laser engraving process unfolds, it's essential to monitor it closely and be aware of specific aspects:
Safety: Always prioritize safety during the engraving process. Ensure that laser safety glasses are worn to protect your eyes from the laser beam. Additionally, have proper ventilation to remove fumes and smoke generated during engraving.
Material Surface: Pay attention to the material's surface during engraving. Some materials, like wood or plastic, may emit a mild odor, which is usually harmless. However, if you notice an unusual or strong odor, it's advisable to pause the process and investigate, as it may indicate issues with the material.
Material Movement: Prevent any accidental material movement during engraving, which can misalign the design or result in unwanted marks. Most laser engraving machines have mechanisms to secure the material in place, such as clamps or pins.
Engraving Depth: Observe the depth and quality of the engraving. If the engraving appears too shallow or too deep, you may need to adjust the power and speed settings. Remember that fine-tuning these settings can make a significant difference in the final result.
Fire Risk: Be alert to the potential fire hazard when engraving certain materials, such as plastics. Although laser engraving is a non-contact process, the concentrated heat of the laser beam can ignite flammable materials. Have a fire extinguisher on hand and be prepared to intervene if needed.
Machine Functionality: Keep an eye on the machine's operation. If you notice any unusual sounds, vibrations, or malfunctions, stop the engraving process immediately and address the issue. Routine machine maintenance is essential to prevent unexpected breakdowns.
Time and Patience: Laser engraving is a precise process that can take time, especially for intricate designs. Patience is key, and it's best not to rush the process. Ensuring everything is aligned and correctly set up will lead to better results.
By following these steps and paying attention to the engraving process, you'll not only achieve more consistent and high-quality results but also enhance your understanding of how your specific laser engraving machine operates. This knowledge is invaluable as you continue to explore the creative possibilities and applications of laser engraving. In the next section of this guide, we will delve into post-engraving cleanup and finishing touches, ensuring your laser-engraved projects are polished and ready to impress.
Post-Engraving: Clean-up and Finishing
The work isn't complete once your laser engraving machine finishes its job. Proper post-engraving clean-up and finishing touches are essential to ensure that your projects are polished, free from any residual debris, and ready to impress.
Detail on How to Clean the Machine After Engraving
After the engraving process, your laser engraving machine may need some cleaning to maintain its functionality and ensure consistent, high-quality results in future projects. Here's how to clean the machine effectively:
Turn Off the Machine: First, power off the laser engraving machine to ensure safety during the cleaning process.
Clean the Working Bed: Remove the material and any debris from the machine's working bed. Wipe it down with a clean, lint-free cloth to remove any loose particles.
Lens Cleaning: Check the lens for any debris or residue. If you notice any dirt or marks on the lens, it's essential to clean it. Follow the manufacturer's instructions for lens cleaning, as specific cleaning techniques may vary depending on the type of lens and machine.
Air Assist and Exhaust: Make sure the air assist system and exhaust fans are clean and functioning correctly. These components help remove smoke, fumes, and debris generated during engraving. Clean or replace filters if necessary to maintain proper ventilation and air quality.
Inspect Mirrors: Check the mirrors and reflectors for dirt or residue. Clean them carefully using the appropriate cleaning solutions and techniques recommended by the machine's manufacturer.
Safety Measures: During cleaning, always wear laser safety glasses to protect your eyes from accidental exposure to laser light. Safety is a top priority when cleaning a laser engraving machine.
Regular Maintenance: Establish a routine maintenance schedule for your machine, which includes periodic cleaning and inspection. Regular maintenance helps prevent issues and extends the lifespan of your equipment.
Steps to Get the Engraved Material Out Safely
Safely removing your engraved material is essential to prevent damage to the material and any accidents. Follow these steps to retrieve your item safely:
Turn Off the Machine: Before attempting to remove the engraved material, ensure the machine is turned off.
Let It Cool: If the material is hot, allow it to cool down to a safe temperature before handling it. Hot materials can cause burns or distort the engraving if touched too soon.
Wear Appropriate Gear: Consider wearing gloves to protect your hands from any sharp edges or residual heat.
Use Tools: Depending on the material, use appropriate tools to remove it. For example, for flat materials, gently use a spatula or flat-edge tool to lift the material from the bed. Be cautious not to damage the material or scratch the surface.
Loose Residue: If there's any loose residue on the engraved item, you can gently wipe it away with a clean, dry cloth. Be careful not to apply excessive pressure to avoid damaging the engraving.
Inspect the Result: Take a moment to inspect the engraving quality and ensure it meets your expectations. If any adjustments or refinements are necessary, note them for future reference.
Tips for Finishing Touches
Finishing touches can elevate your laser-engraved projects and make them stand out. Here are some tips to add that extra flair to your creations:
Surface Treatment: Depending on the material, you can apply treatments like staining, varnishing, or polishing to enhance the engraved surface's appearance.
Paint Filling: For some materials, especially wood, glass, or acrylic, paint filling can add depth and contrast to the engraving. Use acrylic or oil-based paints and a fine brush to carefully fill in the engraved lines or areas.
Protective Coatings: Consider using protective coatings to safeguard your engraving against wear and tear. This is especially relevant for items exposed to environmental elements.
Lighting Effects: You can create captivating lighting effects by placing LED lights or backlights behind translucent materials like acrylic to illuminate the engraving.
Assembly: For projects involving multiple pieces, ensure proper assembly and alignment for a professional and polished finish.
Custom Packaging: If you're creating engraved items as gifts or products, consider custom packaging with your personal touch to make your work even more special.
Post-engraving clean-up and finishing touches are the final steps in the laser engraving process, but they can make a significant difference in the overall presentation and quality of your projects. By maintaining your machine, safely removing the material, and applying creative finishing techniques, you'll be able to create impressive laser-engraved items that leave a lasting impact. In the next section of this guide, we will share valuable tips, tricks, and troubleshooting advice to further enhance your laser engraving skills as a beginner.
Tips, Tricks, and Troubleshooting
Laser engraving, like any craft, can benefit from various tips and tricks to improve your skills and achieve better outcomes. Additionally, understanding common issues and how to troubleshoot them is crucial for a smooth and enjoyable experience.
A Few Beneficial Tips and Tricks for a Better Outcome
Optimize Design Complexity: Start with simpler designs as you gain experience. Complex designs may require more time and advanced settings. Gradually increase the complexity as you become more proficient.
Material Testing: Always perform a test engraving on a scrap piece of the same material before engraving your final project. This helps you fine-tune settings and ensure that the results meet your expectations.
Material Knowledge: Learn about the materials you're engraving. Different materials react differently to the laser, and understanding these nuances will help you achieve the best results.
Use Raster and Vector Graphics: Combining raster and vector graphics in your designs can add depth and detail to your engravings. Raster images are great for shading and depth, while vector graphics are ideal for precise lines and shapes.
Calibration and Alignment: Regularly check and calibrate your laser engraving machine to ensure precise alignment and accurate results. Proper alignment is crucial, especially for multi-pass engravings.
Dithering and Halftoning: Experiment with dithering and halftoning techniques to create different engraving effects. These techniques convert grayscale images into patterns of dots to produce a unique look.
Image Editing Software: Utilize image editing software to enhance your designs before engraving. Adjust contrast, brightness, and sharpness to achieve the desired look.
Scanning Images: If you want to engrave photographs, consider using a photo scanner to capture high-quality images. Scanned images generally engrave more accurately than printed photographs.
Maintenance Routine: Establish a regular maintenance routine for your laser engraving machine. Cleaning the lens and mirrors, checking alignment, and ensuring proper ventilation are essential for consistent results.
Troubleshooting Common Issues
Engraving Depth Inconsistency: If your engraving depth varies across the design, it might be due to uneven material or a misaligned laser head. Ensure the material is flat and secure, and regularly calibrate your machine for proper alignment.
Burn Marks or Charring: Excessive power or slow speed settings can cause burn marks or charring, especially on materials like wood. Adjust power and speed settings to reduce these marks, and consider masking the material to protect its surface.
Incomplete Engraving: If your engraving is incomplete or parts of the design are missing, it could be due to a loose or damaged belt, improper alignment, or issues with the design file. Check the hardware and verify that the design file is complete and properly configured.
Engraving Too Deep: Engraving that's too deep can result from excessive power settings or incorrect focus. Adjust power and speed settings, and make sure the laser head is correctly focused on the material's surface.
Alignment Issues: Misalignment can lead to off-center or skewed engravings. Regularly calibrate your machine to ensure precise alignment. Verify that the material is correctly positioned and flat on the machine's bed.
Laser Not Firing: If the laser doesn't fire, check for loose or damaged wiring, ensure the laser module is connected, and inspect the water cooling system (if applicable) to avoid overheating.
Excessive Smoke and Fumes: Adequate ventilation is essential to prevent excessive smoke and fumes during engraving. If you experience this issue, make sure the exhaust system is functioning correctly and consider improving the workspace's airflow.
Unusual Noises: Unusual machine noises can indicate mechanical issues. Check for loose components, belts, or foreign objects in the machine's path. Regular machine maintenance can help prevent these problems.
Error Messages: Error messages on your machine may indicate various issues. Consult your machine's user manual or contact the manufacturer's customer support for guidance on resolving specific errors.
By following these tips and tricks, you can enhance your laser engraving skills and produce impressive results. Troubleshooting common issues will help you overcome challenges and maintain your machine in optimal condition. With time and practice, you'll become a proficient laser engraver, creating unique and personalized items that reflect your creativity and style.
Conclusion
In this guide, we've embarked on a journey through the intricate art of laser engraving, catering to beginners who are eager to explore this exciting realm. We've covered a range of essential topics, from understanding the basics of laser engraving to the intricate details of design creation, machine setup, and post-engraving care.
Summing Up the Insights Shared
We began with an introduction to laser engraving, defining the concept and its demand among beginners. We highlighted the importance of understanding the process upfront and offered an overview of the entire article to engage readers.
In the subsequent sections, we dived into the fundamental aspects of laser engraving
We explored the structure of laser engraving machines, including the control panel, laser module, and bed. We discussed the various types of engraving machines, such as CO2, fiber, and diode, emphasizing the significance of understanding each part's mechanism and synchronization.
We delved into safety measures, underscoring the importance of wearing protective gear and maintaining a safe working environment. We addressed major risks and their prevention, ensuring the safety of both you and your equipment.
Material selection and preparation were the next focus, as we detailed the suitability of different materials for engraving, including wood, glass, plastic, and metal. We also discussed the importance of material preparation, ensuring cleanliness, smoothness, and the correct size.
Design creation and preparation introduced us to software tools like LightBurn, Adobe Illustrator, and CorelDraw. We outlined how to import and export designs to and from the laser engraving machine, a pivotal step in the process.
Machine setup and calibration were crucial for precise engravings. We guided placing the material correctly, adjusting the lens for the perfect focus, and fine-tuning power and speed settings.
The engraving process was then explained, from design preview and pilot runs to the actual engraving. We emphasized the importance of watching the process closely, maintaining safety measures, and noting potential issues.
Finally, post-engraving clean-up and finishing touches were addressed. We discussed how to clean the machine after engraving, safely remove engraved materials, and add the finishing touches that elevate your projects.
Encouraging Enthusiastic Beginners
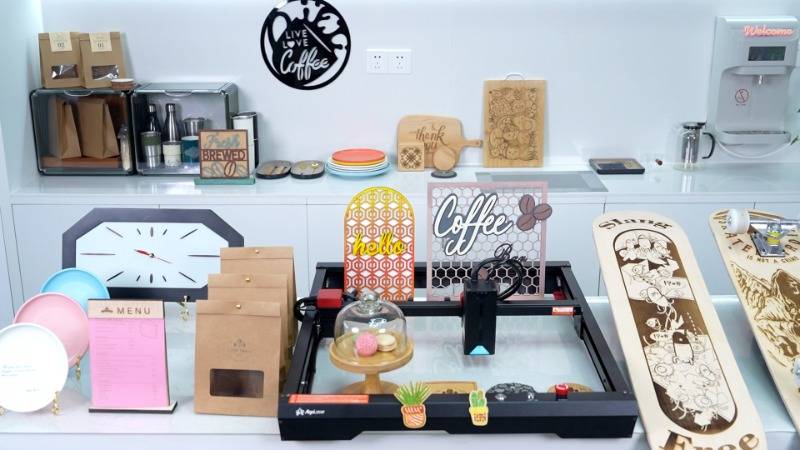
Now, it's time for aspiring laser engravers to embark on their journey. The creative possibilities of laser engraving are boundless. You can craft personalized gifts, intricate artwork, custom signage, and so much more. Whether you're a hobbyist, an artist, or a small business owner, laser engraving offers a unique and versatile way to express your creativity.
As you step into the world of laser engraving, remember that practice makes perfect. It's perfectly normal to encounter challenges and setbacks along the way, but with patience and determination, you can master this art and unlock its full potential. Begin with simple projects, experiment with different materials and designs, and continue learning from your experiences.
With each engraving, you'll refine your skills and discover new techniques. Over time, you'll build a portfolio of remarkable creations that showcase your artistic vision and craftsmanship. And, as you explore the endless possibilities of laser engraving, you'll find a rewarding and enjoyable hobby or even a potential business venture.
So, what are you waiting for? Dive into the world of laser engraving and unlock your creative potential. Embrace the knowledge you've gained in this guide, and let your imagination run wild with the possibilities that laser engraving offers. Remember, the only limit is your creativity, and there's no better time to start than now. Happy engraving!
Free SVG & Gcode Files for Laser Engraving & Cutting can be found here, wich you can import into our laser cutters directly.


